Thursday, August 8, 2013

freezable mini frittatas (frittate) :)

For those of you that know her story, my precious Momma has had a really, REALLY hard last couple years. Cancer... a car wreck... open heart surgery... she's basically been to Sheol and back.
 
Anyway, she really needed a BREAK, so my sister and I planned a trip and took our Mom to her favorite place on earth: Disney World. :)  It was REALLY fun (we hadn't been there in over a decade!)-- but I still wanted to be a blessing to the dear doctor while I was gone for a week.
check us out with The Mouse himself! :)

I made a ton of meals and stuck in the fridge/freezer, and here is one of my creations: Taking a good old recipe for Breakfast Casserole and modifying it for muffin tins!
 

The muffin tins not only take far less time to bake, but when done, you have individually-sized frittata's (frittate is probably the correct Italian plural form!) :) that can be frozen and microwaved later! :)

These were soooooooooooo easy to make, I'm not even going to write a recipe for them because the possibilities are ENDLESS!  

Here are the ingredients I used--just a teeny bit of each!  OH and first, remember to give a quick spritz of oil to each little muffin cup (it's worth it!).  After you oil your cups, I layered the ingredients in each cup, in this order =
  • frozen hash brown potatoes (you can use either cubed or shredded)
  • cooked turkey sausage crumbles
  • diced bell pepper
  • diced onion
  • salt & pepper
  • baby spinach leaves (torn up a little!)
  • 1 egg went in each cup; I chose to use a fork and scramble each egg around a little, but you don't have to do that if you don't want to!  You probably *should*, though, at least use a fork to make sure the egg gets down in all the cracks and helps the other ingredients stick together...!
  • NOTE: the reason they look so bright yellow/orange on top is because when they were done (after about 15-20 minutes on 350*F)... I took sharp Cheddar cheese in little slices and put it on top, and put the muffin tin back in the oven, but this time under the broiler, until the cheese was melted (about 5 min?)
But for goodness' sakes don't be limited to what I did here------ You could use an.y.thing!!!!!!!! Like....
  • tomatoes
  • any meat you wanted (bacon, ham, smoked salmon, Chorizo, even ground beef crumbles--like taco meat-- for a Mexican-inspired frittata, heck even shredded chicken... whatever you like!)
  • zucchini / summer squash
  • chopped asparagus
  • eggplant (however my husband thinks it smells like cadaver from his med school days, so we don't eat eggplant at my house.  sorry if I just ruined anything for anyone). :)
  • any herbs in the world (I was just lazy today)--- but gosh, anything would work depending on what you put with it!..... parsley, oregano, basil, sage, etc. etc.!!!
  • any cheese you like
These mini frittatas are awesome and SO versatile: you could easily do egg-whites only to lower cholesterol, and you could of course make them vegetarian very easily (like subbing Quinoa for the Hash Browns to give it a protein boost) ..The list of options goes on and on!

Have FUN with this-- SORRY I didn't take pictures of the assembly-- but hopefully that encourages you in the fact that they came together **so quickly**... it was over before I could grab my camera! 

I love being able to cook homemade things, freeze them, and eat them later!  The ultimate package, in my mind!! = Convenience PLUS Homemade! :)

If you try these, feel free to leave a comment and share with everyone the great combinations that you try!!!!  Buon appetito! :) 

Wednesday, July 10, 2013

Shea Moisture - LOVE!

SheaMoisture:
Oh how in loooove I am with this company!!!


I first learned about SheaMoisture from my sister-in-law, Sarah, who bought their amazing leave-in hair treatments for her daughter.  I thought these products were for sure purchased in a fancy salon or natural health foods store since they are just SO AMAZING, but turns out-- Sarah told me she got them at TARGET! :)

The SheaMoisture Company makes products for babies and adults both = shampoos, conditioners, leave-in conditioners/styling products, bar soaps, shower gels, bubble baths, lotions, hand creams, etc... Basically everything wonderful you'd want to get ready!

Check out the list of what is NOT included in SheaMoisture products!!! =
  • No Parabens
  • No Phthalates
  • No Paraffin
  • No Gluten
  • No Propylene Glycol
  • No Mineral Oil
  • No Synthetic Fragrance
  • No Synthetic Colors
  • No PABA
  • No DEA
  • No Sulfates
  • No Animal Ingredients
Doesn't that make your heart skip a beat?! :)  If not, listen to the company's story printed on the back of the bottle:
"Sofi Tucker started selling Shea Nuts at the village market in Bonthe, Sierra Leone in 1912. By age 19, the widowed mother of four was selling Shea Butter, African Black Soap, and her homemade hair and skin preparations all over the countryside. Sofi Tucker was our grandmother and SheaMoisture is her legacy. With this purchase, you help empower disadvantaged women to realize a brighter, healthier future."

Doesn't that make you SWOON?!? :)

Additionally, you know your bath and body products are FRESH and REAL when they have an **expiration date** on the bottom of the bottles!  Haha! :)  Along with being so fresh and good for you, SheaMoisture products are never tested on animals, and only use ethically tradedsustainably produced ingredients.

So far, I've tried several products from SheaMoisture.  I LOVE their Organic Raw Shea Butter Hand Cream with Frankincense & Myrrh.  I even bought it for the women who are in my Bible study to make their times connecting with the Lord even sweeter-- to be able to put on this hand cream and smell fragrances that were around at the time of Jesus-- how COOL! :)


My favorite thing about the Olive & Green Tea Body Wash is that a little bit goes a LONG way!  I can sometimes be a product hog and use WAY too much-- but I've seriously been using that bottle for months and it's taking *forever* to deplete!  Awesome!

The "African Black Soap" is so worth it-- if you want somewhere to start with Shea Moisture but don't want to spend $10 on a body wash or lotion, spend $3 and grab a bar of this magical soap.  It has oats in it to naturally exfoliate and my mind never ceases to be blown that the soap suds are grayish/black from this soap and I actually wash my face with it-- haha-- but it is WONDERFUL stuff!!!! :)


The Coconut & Hibiscus Body Lotion smells SO YUMMY especially for summertime-- and it is SO moisturizing!

Lastly, the Yucca & Baobab Thickening Shampoo is delightful, too, *but* I think this product would probably be best on hair that is VERY dry and needs extra moisture.  My hair tends to get greasy somewhat easily and isn't brittle or dry.  But if your hair constantly needs more moisture-- due to your natural texture and/or color treated reasoning-- I'd *definitely* check out this shampoo! :)  It smells GREAT and is super moisturizing (but for me, I only use it a couple times a week... if I use it every day, I get too greasy).

Like I said, I always buy my SheaMoisture stuff at Target, but according to the company, you can buy their products at all Walgreens stores, as well as select Target, CVS, Bed Bath & Beyond, Buy Buy Baby, Christmas Tree Shops, Harmon Face Values, Duane Reade and Meijer stores. (info via their website)

Why I LOVE SheaMoisture in a nutshell: Easily available bath & body products that are good for me (very affordable! fantastic ingredients!), good for the environment (sustainable & organic ingredient production!), and good for others (fair trade!).

Check out SheaMoisture for yourself- let me know what you think! :)

Wednesday, June 19, 2013

100% homemade fresh strawberry pie

you know what else reminds me of my Grandma Marilyn? peonies. :)
My Grandma Marilyn used to make THE BEST strawberry pie.
ever.

:)


I have *fond* memories of picking strawberries alongside her; my sister and I could barely keep up because Grandma was such an awesome picker.  I bet that lady could do a quart every 2 minutes. :) 

Some of my favorite childhood memories include time spent in Grandma & Grandpa's *huge* garden behind their house in the country.  I think this is the only time I used to see either of them in jeans--- haha! :)  Grandma was such a classy lady and hardly ever wore plain denim slacks--- but for gardening, she'd throw on her denim, grab the old radio, put on a pretty plaid button-up shirt, and come outside with Kayla and I.

As soon as she got the radio set to a classic AM station (I remember 1220 WERT and 1190 WOWO)--- we'd get down in the patch and start picking. :)

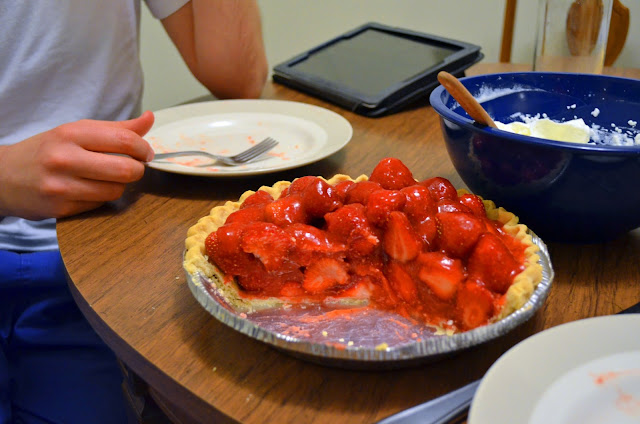
Kayla and I could definitely dominate a few quarts by ourselves-- but when Grandma would say, "Girls, don't eat too many cause I'm makin' a pie later today!" ...we definitely found some self-control. :)  Grandma Marilyn's strawberry pie was just... OUTSTANDING!  I never understood why the strawberry pies in the restaurants didn't taste as good as Grandma's-- and I think now that I'm older, I realize that Grandma didn't use the premade gel packets you can buy in the stores.  As a lady born in what Tom Brokaw has labeled "The Greatest Generation," she knew how to make anything from anything and just make do with--- or without!  Grandma's pie was awesome because she MADE the filling from scratch--- no store-bought "goo," no box of Jello with food coloring added, no nothing!......not a single bite was phony, but instead filled with luscious strawberry goodness. :)

Oh how I loved spending time with my Grandma--- and miss her every day!!!

Even though amidst all the recipes I *do* know of hers, the strawberry pie recipe is one I've never found.  I was inspired by this recipe on the internet though, and modified it for me. :)  Don't be scared away by making pie if you've never done it--- this recipe is SO EASY!!!!!!

I think Grandma would be proud!!! <3


fresh strawberry pie
ingredients:
2 quarts strawberries (fresh from the farm are desired!)
scant 1/2 cup water
scant 3 Tbsp cornstarch
   *check your local food stores for non-GMO Cornstarch!
3/4 cup sugar (if your berries are really sour for some weird reason you could bump this to 1 cup)
1/2 Tbsp butter
one, 9" pie crust (either make it yourself or buy one from the store.)
    *I tried Paula Deen's flaky pie crust recipe from her "Southern Cooking Bible" last night and it was great!
    *If you've never made pie crust before, I HIGHLY RECOMMEND that you spend a teeny bit of money and purchase a pastry cloth and a rolling pin cover.  You will NEVER be sorry you did! I never thought I could make pie, until my dear mother-in-law taught me how to use a pastry cloth & rolling pin cover.  LIFE-CHANGING!!! :)

directions
  • if you're making your own pie crust, do this FIRST.  Roll out and bake the empty pie shell (don't forget to put your pie weights on top of your crust to keep it from bubbling up!! I used a bag of dried black-eyed peas because I don't have any fancy clay pie weights) :)  When your crust is baked, remove the weights/dried beans and let it cool!
  • take a few of the less-pretty (but just-as-tasty!!) strawberries; rinse them off, and crush them up till you have 1 cup of crushed berries (I did the crushing right in my pyrex clear liquid measuring cup so I knew right when I had 1 cup!)
  • To a small saucepan, add the 1 cup crushed strawberries, plus the water, cornstarch, and sugar.
  • Cook this mixture on medium-high heat until it boils, stirring constantly.
    • At the beginning of this, I used my immersion blender to really blend everything together.  I highly recommend doing this step! If you don't own an immersion blender, maybe you can make the strawberry mixture in a food processor at first!  OR if you don't own any blending/processing equipment, your "filling" mixture will still be GREAT!  It will just be a little more 'chunky' rather than smooth. :)
  • When the strawberry filling mixture reaches a bubbling boil, let it cook for exactly 2 more minutes **stirring constantly**!
  • Take the filling off the heat and add your 1/2 tablespoon of butter.  Stir the butter in, then let your filling cool for a while.  Honestly I put mine right in the fridge and let it sit until it wasn't super-hot... then moved it to the freezer to cool even quicker. I only had my filling in the freezer for 10 minutes or less.  Just enough to get it to room temp!
  • while you're waiting on the filling (and maybe crust) to cool, take all of your remaining strawberries and rinse, dry, set aside for pie.  Maybe you like to slice your strawberries... but I remember Grandma always left them whole--- so I did, too! :)  I did, however, cut the really big strawberries in half or thirds so all the berries/berry pieces were about the same size.
  • Arrange the strawberries in the baked pie shell.
  • When the glaze is cool enough/room temperature, pour the filling over all the berries. If needed, spread it around with a spatula to help it get in all the cracks.
  • Let pie cool in the fridge for about an hour (or until you can't wait anymore! haha!) :)
Definitely serve with whipped cream!  I bought a pint of whipping cream and added about a tablespoon of sugar and whipped my own!  So worth it!!!!!


 Enjoy!! It is SO EASY and THE BEST! :)

just look at that mountain of strawberry gloriousness!!!  the Doctor and I dominated a good bit of it last night! soooo good! :)
speaking of grandmothers... at my husband's Grandma Vera's house, a sign that you loved your pie was that you lick the plate clean! :)  I'm so glad that both of us keep our grandparents' traditions alive in our own home today! :)

Friday, June 7, 2013

Coconut Chicken


I had such a fun time making this chicken! :)
A perfect recipe for 2 people (obviously you can double/triple it), and I love that it's EASILY convertible to a Gluten-Free recipe! :)

Coconut Chicken
serves 2, total time about 15 minutes
ingredients:
*****Note: I didn't measure when I made this; so feel free to add/subtract amounts as you see fit! I am just estimating what I did) :)

* 2 boneless, skinless chicken breasts (I used 3 breast tenderloins, actually; gave one to myself and 2 to the Doctor) :) BUT you could easily use a few chicken thighs, too! whatever you like.
* 1 egg
* about 1/2 to 2/3 cup flour
* about 1/4 cup shredded, unsweetened coconut 
* about 1/4 cup Panko breadcrumbs
* pinches of salt & pepper
* 4 Tbsp. Coconut Oil

**To make Gluten-free, substitute Gluten-free flour for the all-purpose wheat flour; Substitute GF breadcrumbs for the Panko-- OR I bet a GF cereal like Rice Krispies or Chex would be awesome! :)  The purpose of the Panko was just to give it some crunch! :)

directions:
Heat the Coconut oil in a skillet on medium-high heat.
Blend the flour, coconut, Panko, and salt and pepper in a food processor until it comes together (about 10-15 seconds). :)  Place breading mixture on a plate.
Beat the egg in a small bowl (but big enough to dip your chicken).
Dip chicken into the egg, then into the breading.
Cook breaded chicken in Coconut oil until golden brown; flip; cook on other side till golden brown. :) 

I served this with wild rice and sauteed spinach! ;)
Enjoy! :)
 

Thursday, May 16, 2013

sparkling strawberry limeade

just couldn't help but continue my obsession with strawberries and all things spring... I decided to make this "mocktail" for us last night just to have something fun on a random Wednesday evening. :)
This sparkling limeade is perfect to serve to kiddos, at baby showers, to bring on picnics, etc. :) 
sparkling strawberry limeade
serves 2-4, depending on glass size/how much you're willing to share ;)
Juice two large limes. (If your limes look super-small, you might want to do 3). :)
Add the juice from the limes to your mixing pitcher/cocktail shaker/etc.
To the lime juice, add 2 to 4 sliced strawberries (depending on the size of your berry and how much berryness you want) :)
Depending on how sweet you like your drinks, add granulated white sugar to the juice following this chart:
like it sour = add 1/4 cup
like it sweet/sour = add 1/3 cup
like it sweet = add 1/2 cup
Obviously you can do more/less to taste. :)
Mix/muddle/shake the lime solution very well at this point--- because you won't want to mix it harshly after adding the sparkling water and ruin all those magical bubbles! ;)
Once you feel the sugar is dissolved, add one, 1-Liter bottle of San Pellegrino Sparkling Water to the lime juice mixture.
Carefully pour into glasses and enjoy. (*note: If you want to garnish with sliced limes, you'll need to buy one extra at the store.)
<3

Tuesday, May 14, 2013

Mixed Greens Salad with Strawberry-Balsamic Dressing

How pumped am I when it's that wonderful time of year when the Organic Strawberries are cheaper than they've been all winter!?!....... :)  YES.  Spring is here, at last! :)
 
 
Tonight I made this super-simple, super-delicious salad in all of 5 minutes.
 
Mixed Greens Salad with Strawberry-Balsamic Dressing
 Makes enough salad for 2-3 people for dinner-sized portions; obviously you can stretch it to more people if you make the portions smaller.
 
For the salad, layer:
Mixed greens and/or Baby Spinach (I used a whole 5 oz. carton of organic greens from Kroger) :)
Chicken, made the day before, from this recipe
Fat-free Feta (I bought the smallest container of crumbled feta available; we used probably half-ish to 2/3rds of it)
Sliced Strawberries (between the dressing and the salads you could go through a quart if you like it extra-berryish) :)
Pecans, candied or regular-- whatever blows wind into your sails :) (I used just a few store-bought candied ones, but you can learn to make your own sugared pecans here if you're feelin frisky) :)
 
For the dressing, combine (I did mine in my food processor):
5-6 strawberries, cut up a little before adding to the FP bowl
probably 2 Tbsp. sugar
3-4 Tbsp. balsamic vinegar, or to taste
A few leaves of fresh, flat-leaf parsley
Salt & pepper
*2-3 Tbsp. extra-virgin olive oil
 
*Process dressing ingredients until all are emulsified; remember to add oil last.
 
enjoy <3 :)


Tuesday, April 23, 2013

Caprese Pasta

Spring is FINALLY here! YAY!!!!!  To celebrate, I'm making Caprese Pasta! :)

Many of y'all out there have had a Caprese (cuh-pray-say) Salad before (you know, the fresh tomato with the fresh mozzarella and basil leaves--- sprinkled with salt and olive oil and maybe even a teensy bit of Balsamic?)

Well-- when you have a beautiful bounty of tomatoes and basil, you should definitely grab a ball of fresh mozzarella and either (1) eat that amazing salad OR (2) throw the ingredients together to make a really delicious pasta dish. :)

Caprese Pasta
--serves as many as you want; I usually proportion 1 pint tomatoes per 2 people and 8 oz. mozzarella can go for 3-4 people; one, 1-lb. box of pasta is good for 4 people.

STEP 1: Gather Ingredients.
  • In *my* very tiny opinion, you need 1 Pint of tomatoes PER 2 people. Cause they're full of lycopene and Vitamins A, C, and E --AND other good-for-you-stuff.  :)  My preference for this dish are *cherry* tomatoes but by all means you can use grape-sized-- OR frankly, whatever size you want.  I think the larger tomatoes really change the dynamic of this dish so I never use them.  But, as the Italians would say= fai come ti pare. ("Do what you want"). :)
  • If I'm feeling piggish, I can split one 8-ounce ball of Mozzarella per 2 people, but sometimes I feel like it's a little much.  One, 8-oz. ball of mozzarella can easily stretch for 3-4 people.  If you wanna spend a little extra cash, purchase the Ciliegine-sized mozzarella balls (Ciliegine = relates to the Italian word for "cherry"); their small size cuts out a step of chopping up your mozzarella ball.
  • You need olive oil, a few cloves of garlic, salt, and pepper.
  • Choose your favorite 1 lb. box of pasta. (Shown in the pictures was penne rigate).
  • You will also need a small stem of fresh basil leaves.
STEP 2: Cook!
Gosh, this dish is SO EASY and SUPER-FAST to make.
1) Get a pot of water to a rolling boil; salt it till it tastes like the ocean, :), and put in your pasta.  Be sure to take out your pasta when it still has a bite/is chewy and perfectly done (aka "al dente"/to the tooth). :)
2) While your pasta is cooking--- chop all your cherry tomatoes in half.  If you have a large ball of mozzarella, you will also cut that up.


3) Still while your pasta is cooking, get a skillet; add olive oil and tomatoes.  Then add garlic, salt, and pepper.  (not too much salt though, because your pasta should be deliciously salty.) :)

*When your pasta is almost done, chop your basil with a very sharp knife.  I usually do mine in a chiffonade--- aka take your leaves; make a stack; roll them like a cigar-shape; then chop the little basil roll into little ribbons. :)


4)  Drain your pasta; add to the tomato/oil mixture.


5)  Add the mozzarella and basil and SERVE IMMEDIATELY! :)

buon appetito! :)


Sunday, April 7, 2013

1 Dozen Hearty Pumpkin Muffins


When you're a small family like the doctor and myself, you definitely need muffin recipes that only make a dozen.  It's just SO NICE to a) not use up a ton of ingredients at one time, b) not eat whatever type of muffins for days and days and days and days, and c) do a one-bowl, one-pan operation that is faster to bake and faster to clean up!

I adapted this recipe from this website I just found that I will be frequenting!  Looks like the author posts a ton of great stuff! :)  

**Please note that my heart in adapting this recipe was to make them healthy-- I cut down on the sugar, I substituted coconut oil for the butter, didn't use all-purpose flour and subbed whole wheat white plus ground flax seeds (SO GOOD for your heart!).. added more spices for flavor, etc... So when you take a bite of these and they don't knock you over the moon with their sugary-sweetness, don't be disappointed!  Just pat yourself on the back that you made something GOOD for you-- and treat yourself to a second muffin, guilt-free! ;)

And yes, I know it's springtime and 60 degrees Fahrenheit outside... and I should be posting recipes like "Citrus-Marinaded Chicken" or "Asparagus and Pea Shoot Linguine" or springy-sounding things.... But this is one of many posts dedicated to *cleaning out my freezer* from last summer/fall's bountiful harvest.  Today, I wanted to use up some of the AWESOME pumpkin puree I have.... so here goes!


Hearty Pumpkin Muffins (makes 12 regular muffins)
*Preheat oven to 375 degrees Fahrenheit.
*Line a 12-cup muffin pan with liners. (Lately I've been using fancy parchment cupcake liners and they are divine! SO worth the money!)

Ingredients:
1/4 C coconut oil
1/3 C dark brown sugar
3/4 C (heaping!) pumpkin puree
1/4 C milk (can use whatever kind you want! almond, rice, soy, etc. if you want dairy-free!)
1/4 C brewed coffee (could use water OR extra milk if you hate coffee!--- but I don't know how anyone could hate coffee.....?) :)
2 eggs
1 C White Whole Wheat Flour (I just bought some at Trader Joe's and I am IN LOVE!)
1/2 C ground flax seeds
1/2 C oat bran (NOT oatmeal!-- but oat bran!)
1 tsp. baking soda
1/2 tsp. baking powder
1/4 tsp. salt
1/2 tsp. (heaping!) ground cinnamon
1/4 tsp. ground ginger
couple shakes of ground nutmeg
couple shakes of ground gloves

Mix oil and sugar.  Carefully beat in pumpkin puree, milk, coffee, and eggs.  In the same bowl, carefully scoop out all the dry ingredients, (just go down the list!), and add them right on top of the wet mixture.  Mix all the dry ingredients into the wet until just combined.

I used a large cookie/cupcake scoop to scoop out the batter into the 12 muffin cups... but if you don't have on in your kitchen, just use a big spoon or a clean 1/4 cup measuring cup! :)

Before I popped them in the oven, I sprinkled each scoop of batter with some Caramel-Cinnamon Sprinkles my Mom got me.  If you don't have those, you could either 1) leave them plain 2) sprinkle with cinnamon and "sugar in the raw"-type Turbinado Sugar 3) make a streusel topping with flour/butter/brown sugar/cinnamon 4) sprinkle walnuts or pecans... etc.. the possibilities are endless! :) 

Bake at 375*F for 20 minutes, or until a toothpick comes out clean!

ENJOY!  These mighty muffins are PACKED with GREAT ingredients you can really feel good about eating!!!! :)


Tuesday, January 22, 2013

butternut squash soup

ok how have I not blogged since SEPTEMBER? :(
shame on me.

I'm not even gonna go there and say "For my New Year's Resolution, I'm going to blog once a week!"...... cause we all know that isn't gonna happen.  But for reals, I'm gonna get better y'all.

To kick start 2013, let me share one of the FAVES from this household: Butternut Squash Soup :)  Oh the joy of eating vegetables!  YUMMMMMMMM :)


INGREDIENTS:
Olive oil
1 little onion (or half a medium onion)
2 garlic cloves
1 medium butternut squash
2-4 red potatoes OR 1 Idaho russet (if I were y'all I wouldn't worry about peeling the potatoes if they are red BUT if you use a russet, I'd peel that bad boy)
1 pint homemade pumpkin puree OR 1 15ish ounce can pureed pumpkin (not pie filling)
good sprinkling of kosher salt & black pepper
1, 15-ounce can of chicken broth/vegetable broth/whatev. ...heck you could probs just use water if desperate :)
a teeny bit of rubbed sage (I crumbled one dry sage leaf I dried from our garden this summer. Maybe it was 1/8 to 1/4 teaspoon?)
some thyme (again I used dried stuff I saved from this summer's garden- I used probably 4-5 sprigs worth; it was probably 1/2 teaspoon)
2-4 Tbsp. dark brown sugar (or light, but I like dark better)
a couple shakes of cinnamon (maybe 1/4 tsp. total?)
teeny shake of pumpkin pie spice (if you don't have this you can do a teeny bit of nutmeg, or frankly, just forget it altogether.) ;)
1 pat of unsalted butter (not margarine!...) (...less than a Tbsp) 
Parmigiano-Reggiano, freshly grated, for serving

FIRST, PREP! :)
  • Peel the butternut squash.  Cut it in half; remove the seeds and all the stringy fibers (just like you do with a pumpkin when making a Jack-o-Lantern). :)
  • Dice the onion; peel and mince the garlic.
  • Again, if you have a Russet potato, peel it and slice; if you're using Golds or Reds just wash and slice them.
THEN, COOK!
  • In your big soup pot/Dutch oven/cauldron/whatever you use :)....... saute the onion in the olive oil just for a bit till they look a little more translucent & tender. Add the garlic and stir; saute only for about a minute (garlic burns easily)!  Give all this a sprinkle of salt & pepper.
  •  Add the cubed butternut squash AND the potato slices. Stir all this around so it coats nicely with the sauteed onion/garlic.
  • Add the can of broth. Then, fill up your can with water and add slowly till everything is almost covered with liquid (don't drown it though. Just get it almost covered).
  • Add your Thyme and Sage.  Maybe season with a little more S & P. :)
  • Let all this come to a boil and then turn down your heat and simmer this till everything is tender. (maybe 10 minutes at the least, 25 mins at the most).
  • When everything is tender, turn your heat off, and puree the soup with an immersion blender OR transfer everything, in batches, to a food processor or blender (NOTE: I've only ever done this with an immersion blender, so I have no idea how much of a pain the other two pieces of equipment are?.... If you have a FP I'd go for that first; use a blender at last resort).  Puree the soup until everything is "creamy" and bisque-like. :)
  • Add your pumpkin puree, and stir (the soup should be blazin' hot and will heat your pumpkin puree in no time).
  • Carefully add your dark brown sugar, cinnamon, (and pump. pie spice if using) to taste. START SMALL: as my Momma would say, "You can always add, but you can't take away!!!"
  • Season with salt and pepper only if necessary!
  • Lastly, if you're feeling naughty (which I usually am in this dimension of life), add a pat of butter to the pot. :)  Cause a pat of butter makes most things BETTER. :) But again, if you're counting cals and are trying to be good, by all means, leave the butter out. :)
Serve in bowls with freshly grated Parmigiano-Reggiano cheese.  And enjoy something that is not only GOOD FOR you---but also GOOD! :) 

p.s. while you grate some Parm on your bowl, watch this classic Italian TV commercial, advertising for Parmigiano-Reggiano. :)  Oh I LOVE Italians. and their cheese. :) <3 (p.s. thanks Beccs for introducing me to this vid) :)