Tuesday, May 27, 2014

Low Maintenance Fish Tacos

In the frozen black heart of this year's winter, the Dr. and I went to Sarasota, FL for a much-needed break.


While there, we were definitely in "vacation-mode" and felt the freedom to eat out. a lot. :)  One of our favorite places to eat was Clayton's Siesta Grille.  We LOVED their Trout Almondine and Mahi Mahi Fish Tacos!

April/May is traditionally my "clean out the freezer" time of year so I can have ample space for summer & fall harvests.  In my quest to use everything up, I found some great Mahi Mahi filets from Trader Joe's and had a craving for some amazing fish tacos (even though I knew I couldn't quite recreate the unbelievable ones at Clayton's!), so after reading many recipes, I created my own low-maintenance version.

Fire up your grill and go make these!  You'll love them! :)

Mahi Mahi Tacos with Citrusy Cabbage, Avocado, & Mango
(could serve 4 adults)


ingredients:
4 mahi mahi filets (fresh or frozen, thawed)
salt & pepper
extra-virgin olive oil
2 medium avocadoes, diced
1 small onion, diced (use half if a bigger onion)
1 good sized mango, diced
1 small cabbage, chopped into thin shreds
1 orange
2 limes
1 bunch cilantro, leaves plucked
sour cream
corn OR flour tortillas (I used corn)

optional ingredients that would be awesome but I didn't use:
  • using finely chopped Chipotle peppers/dried powder to mix with the sour cream OR use a little Chipotle powder directly on the fish before grilling
  • minced jalapenos
  • diced tomatoes
  • drained & rinsed black beans
  • using purple onion OR scallions instead of yellow/white onion
  • pureeing tomatillos and garlic to mix with the sour cream for a festive crema
  • store-bought mango/pineapple/peach salsa (if you can't find a good mango OR just want a more low-maintenance option!)
  • diced peppers of any kind (from sweet bell to any chile... depending on how spicy you wanna be!)
  • using a store-bought coleslaw mix if you don't feel like chopping cabbage!
  • Clayton's serves their mahi tacos with feta cheese

directions:
Shred cabbage and place in bowl. Squeeze the juice from the orange and one of the limes onto the cabbage.  Salt and pepper to taste.  Stir together and let marinade for a bit.

Heat grill to high.  Coat fish fillets in a little bit of olive oil, and season well with salt and pepper (and Chipotle powder if using). Grill fish on a piece of foil for about 10-15 minutes, until white and firm.

Finely chop mango, avocadoes, and onion.  Pluck leaves from cilantro. 
*At this point, I squirted a few drops of lime juice on the avocado to prevent browning!

When Mahi Mahi is grilled completely, remove from grill and set aside to cool for just a minute.  Get tortillas ready-- warm them if desired on the grill for just a little bit! :)

Shred Mahi Mahi into bite-sized pieces. 

Serve tacos with the fish, citrus-infused shredded cabbage, and all the diced veggies & mango.  A dollop of sour cream and a few cilantro leaves make for the perfect finish!

Buon Appetito! :)

Thursday, February 6, 2014

Pasta with Greens, Prosciutto, Raisins, & Pine Nuts


I first learned about this recipe when I lived in Rome. My friend Kristen made it for a group of American college students who came to Rome on their spring break to join with us in ministry.  She braised some chicken in this gorgeous, stewy sauce of cannellini beans, sun-dried tomatoes, fresh rosemary, and other ingredients.  She served the chicken/beans with a lovely pasta of farfalle, sautéed spinach and garlic, pine nuts, raisins, prosciutto, a heavy drizzle of extra-virgin olive oil, and lots of grated Parm.
 
I totally forgot about this pasta dish--- and in our almost 3 years of marriage, I don't think I've ever made it for Dr. Bud!  How sad.  Granted, with ingredients like prosciutto, pine nuts, and real Parmigiano-Reggiano, it's kind of an expensive dish.
 
I don't know what made me remember this pasta tonight, but I'm so glad I did!  I texted my friend Chris for a refresher on the ingredients needed for it-- and got to work.
 
Pasta with Greens, Prosciutto, Raisins, & Pine Nuts
serves 2
 
First, I diced some red onion-- about 1/4 cup, but you could easily use shallots, OR leave this out altogether... and 1 clove of minced garlic. (or 2 if you're feeling frisky.) :)
 
Add this to your pan with a few swirls of olive oil.
 
Saute your onions/garlic with whatever greens you'd like.
Tonight, I used a mixture of baby spinach and baby kale. (probably 3ish cups raw)
Also, I did NOT have any Prosciutto sitting around in my fridge... but I did have some nitrate-free deli ham. LOL. I used about 5 slices, diced them up, and threw them in.  (If you do this as well, note that it's worth your time to separate the little slices to give the thinly-sliced-Prosciutto-effect). :)
 
 
Next, cook and drain 1/2 a box of pasta.  Add the pasta to the pan of greens/etc.
 
 
While your pasta water is hot, add in 1/4 to 1/3 cup (or so) of raisins. You can use any kind you want. I think it's a genius move to put your raisins directly in a spider strainer like this- so that after a couple minutes, you can lift them right out and add them to the pan!
NOTE: Even if you don't like raisins-- TRY THEM in this dish! :)
 
 
Next, add in a couple handfuls of pine nuts------- maybe 1/4 to 1/3 cup.
 
ohhhhh PARM <3


Okay- now grate yourself a mountain of Parm, cause it's delightful.
Stir to incorporate----- swirl extra olive oil if you feel it needs it.
Salt and pepper to taste. :) 
 
 
Now serve yourself a bowl or plate full... and go ahead and grate another Parm-mountain. You deserve it. :)
 
Buon appetito! :)
 
End note: upon eating this when he eventually got home at 10pm (oh vascular service...), he said, "Hey! This is just like the Italian version of 'Korma!"  Gosh. With the raisins and pine nuts-- and sweet/savory taste... He is SO. RIGHT. :)  My husband never ceases to amaze me!! <3

Monday, February 3, 2014

Spurious Samoa Squares

Here's a new word I learned today-- "spurious" is a synonym for "fake"! ;)
I wanted something with alliteration for my post title!
 
ANYWAY-
It's been a cold winter here in Ohio, and one of the great things about the cold is that it's a great excuse to turn on my oven!! ;)
 
Girl Scout cookies won't be delivered for several weeks, and today, I had a craving for some Samoas, (the coconuty/caramely/chocolatey cookies), so I made this QUICK and super-easy recipe that I heavily adapted from Martha Stewart.
 
Preheat oven to 375*F; line a 10x15" pan with parchment paper.

Crush graham crackers in your food processor, OR buy pre-made ones.

          The original recipe calls for:
           1/4 Cup sugar
           1 and 1/2 sticks butter (3/4 Cup total); melted
           3 Cups graham cracker crumbs
 
BUT today I took OUT the sugar (who needs the extra calories?!), and did something I think I will ALWAYS do for the rest of my baking life!

Wanna hear my healthy trick of the day?! :)
(I'm super pumped about it.) :)
 
Ground Flaxseed is literally THE SAME TEXTURE as Graham cracker crumbs.  Replacing some of the cookie crumbs with the ground flaxseed helps provide amazing nutrients for your body AND cut down on sugar!!  YAY!
 
Today I replaced 1/3(ish) cup of the Graham cracker crumbs with ground flaxseed-- but maybe in the future I will do more?! :)
 
Another great substitute I could have done, but didn't think of until afterward, was to substitute some/all of the butter for coconut oil. (Next time!)... :)
 
 
Anyway, after combining the ground flaxseed/Graham cracker crumbs and melted butter (and/or coconut oil), spread in your parchment-lined 10x15'' pan until it looks like this:
 
 
Then, bake at 375*F for 5 minutes, then rotate the pan, then 5 more minutes.
Take the crust out and let it cool a little.
 
 
Sprinkle 1 cup of pecan pieces AND 1 cup  (I probably did 1 and 1/3 cups... haha) ;) of chocolate chips.
 
 
Then you'll need a regular 14-ounce can of sweetened condensed milk. Have I ever mentioned that this can opener is one of my FAVORITE kitchen gadgets?! Completely life-changing. :)
 
 
Anyway, open that can of sweetened condensed milk and pour it over everything.


Sprinkle the "spurious Samoas" with 1 and a 1/2 cups of shredded coconut (I love to use unsweetened because with all of this... do we really need extra sugar?! I think not.)

Bake in your oven (which you left at 375*F) for 10 minutes-- until your coconut is gloriously toasted!
 
 
COOL-- and then cut into squares/bars/whatever --- and enjoy! :)


Thursday, August 8, 2013

freezable mini frittatas (frittate) :)

For those of you that know her story, my precious Momma has had a really, REALLY hard last couple years. Cancer... a car wreck... open heart surgery... she's basically been to Sheol and back.
 
Anyway, she really needed a BREAK, so my sister and I planned a trip and took our Mom to her favorite place on earth: Disney World. :)  It was REALLY fun (we hadn't been there in over a decade!)-- but I still wanted to be a blessing to the dear doctor while I was gone for a week.
check us out with The Mouse himself! :)

I made a ton of meals and stuck in the fridge/freezer, and here is one of my creations: Taking a good old recipe for Breakfast Casserole and modifying it for muffin tins!
 

The muffin tins not only take far less time to bake, but when done, you have individually-sized frittata's (frittate is probably the correct Italian plural form!) :) that can be frozen and microwaved later! :)

These were soooooooooooo easy to make, I'm not even going to write a recipe for them because the possibilities are ENDLESS!  

Here are the ingredients I used--just a teeny bit of each!  OH and first, remember to give a quick spritz of oil to each little muffin cup (it's worth it!).  After you oil your cups, I layered the ingredients in each cup, in this order =
  • frozen hash brown potatoes (you can use either cubed or shredded)
  • cooked turkey sausage crumbles
  • diced bell pepper
  • diced onion
  • salt & pepper
  • baby spinach leaves (torn up a little!)
  • 1 egg went in each cup; I chose to use a fork and scramble each egg around a little, but you don't have to do that if you don't want to!  You probably *should*, though, at least use a fork to make sure the egg gets down in all the cracks and helps the other ingredients stick together...!
  • NOTE: the reason they look so bright yellow/orange on top is because when they were done (after about 15-20 minutes on 350*F)... I took sharp Cheddar cheese in little slices and put it on top, and put the muffin tin back in the oven, but this time under the broiler, until the cheese was melted (about 5 min?)
But for goodness' sakes don't be limited to what I did here------ You could use an.y.thing!!!!!!!! Like....
  • tomatoes
  • any meat you wanted (bacon, ham, smoked salmon, Chorizo, even ground beef crumbles--like taco meat-- for a Mexican-inspired frittata, heck even shredded chicken... whatever you like!)
  • zucchini / summer squash
  • chopped asparagus
  • eggplant (however my husband thinks it smells like cadaver from his med school days, so we don't eat eggplant at my house.  sorry if I just ruined anything for anyone). :)
  • any herbs in the world (I was just lazy today)--- but gosh, anything would work depending on what you put with it!..... parsley, oregano, basil, sage, etc. etc.!!!
  • any cheese you like
These mini frittatas are awesome and SO versatile: you could easily do egg-whites only to lower cholesterol, and you could of course make them vegetarian very easily (like subbing Quinoa for the Hash Browns to give it a protein boost) ..The list of options goes on and on!

Have FUN with this-- SORRY I didn't take pictures of the assembly-- but hopefully that encourages you in the fact that they came together **so quickly**... it was over before I could grab my camera! 

I love being able to cook homemade things, freeze them, and eat them later!  The ultimate package, in my mind!! = Convenience PLUS Homemade! :)

If you try these, feel free to leave a comment and share with everyone the great combinations that you try!!!!  Buon appetito! :) 

Wednesday, July 10, 2013

Shea Moisture - LOVE!

SheaMoisture:
Oh how in loooove I am with this company!!!


I first learned about SheaMoisture from my sister-in-law, Sarah, who bought their amazing leave-in hair treatments for her daughter.  I thought these products were for sure purchased in a fancy salon or natural health foods store since they are just SO AMAZING, but turns out-- Sarah told me she got them at TARGET! :)

The SheaMoisture Company makes products for babies and adults both = shampoos, conditioners, leave-in conditioners/styling products, bar soaps, shower gels, bubble baths, lotions, hand creams, etc... Basically everything wonderful you'd want to get ready!

Check out the list of what is NOT included in SheaMoisture products!!! =
  • No Parabens
  • No Phthalates
  • No Paraffin
  • No Gluten
  • No Propylene Glycol
  • No Mineral Oil
  • No Synthetic Fragrance
  • No Synthetic Colors
  • No PABA
  • No DEA
  • No Sulfates
  • No Animal Ingredients
Doesn't that make your heart skip a beat?! :)  If not, listen to the company's story printed on the back of the bottle:
"Sofi Tucker started selling Shea Nuts at the village market in Bonthe, Sierra Leone in 1912. By age 19, the widowed mother of four was selling Shea Butter, African Black Soap, and her homemade hair and skin preparations all over the countryside. Sofi Tucker was our grandmother and SheaMoisture is her legacy. With this purchase, you help empower disadvantaged women to realize a brighter, healthier future."

Doesn't that make you SWOON?!? :)

Additionally, you know your bath and body products are FRESH and REAL when they have an **expiration date** on the bottom of the bottles!  Haha! :)  Along with being so fresh and good for you, SheaMoisture products are never tested on animals, and only use ethically tradedsustainably produced ingredients.

So far, I've tried several products from SheaMoisture.  I LOVE their Organic Raw Shea Butter Hand Cream with Frankincense & Myrrh.  I even bought it for the women who are in my Bible study to make their times connecting with the Lord even sweeter-- to be able to put on this hand cream and smell fragrances that were around at the time of Jesus-- how COOL! :)


My favorite thing about the Olive & Green Tea Body Wash is that a little bit goes a LONG way!  I can sometimes be a product hog and use WAY too much-- but I've seriously been using that bottle for months and it's taking *forever* to deplete!  Awesome!

The "African Black Soap" is so worth it-- if you want somewhere to start with Shea Moisture but don't want to spend $10 on a body wash or lotion, spend $3 and grab a bar of this magical soap.  It has oats in it to naturally exfoliate and my mind never ceases to be blown that the soap suds are grayish/black from this soap and I actually wash my face with it-- haha-- but it is WONDERFUL stuff!!!! :)


The Coconut & Hibiscus Body Lotion smells SO YUMMY especially for summertime-- and it is SO moisturizing!

Lastly, the Yucca & Baobab Thickening Shampoo is delightful, too, *but* I think this product would probably be best on hair that is VERY dry and needs extra moisture.  My hair tends to get greasy somewhat easily and isn't brittle or dry.  But if your hair constantly needs more moisture-- due to your natural texture and/or color treated reasoning-- I'd *definitely* check out this shampoo! :)  It smells GREAT and is super moisturizing (but for me, I only use it a couple times a week... if I use it every day, I get too greasy).

Like I said, I always buy my SheaMoisture stuff at Target, but according to the company, you can buy their products at all Walgreens stores, as well as select Target, CVS, Bed Bath & Beyond, Buy Buy Baby, Christmas Tree Shops, Harmon Face Values, Duane Reade and Meijer stores. (info via their website)

Why I LOVE SheaMoisture in a nutshell: Easily available bath & body products that are good for me (very affordable! fantastic ingredients!), good for the environment (sustainable & organic ingredient production!), and good for others (fair trade!).

Check out SheaMoisture for yourself- let me know what you think! :)

Wednesday, June 19, 2013

100% homemade fresh strawberry pie

you know what else reminds me of my Grandma Marilyn? peonies. :)
My Grandma Marilyn used to make THE BEST strawberry pie.
ever.

:)


I have *fond* memories of picking strawberries alongside her; my sister and I could barely keep up because Grandma was such an awesome picker.  I bet that lady could do a quart every 2 minutes. :) 

Some of my favorite childhood memories include time spent in Grandma & Grandpa's *huge* garden behind their house in the country.  I think this is the only time I used to see either of them in jeans--- haha! :)  Grandma was such a classy lady and hardly ever wore plain denim slacks--- but for gardening, she'd throw on her denim, grab the old radio, put on a pretty plaid button-up shirt, and come outside with Kayla and I.

As soon as she got the radio set to a classic AM station (I remember 1220 WERT and 1190 WOWO)--- we'd get down in the patch and start picking. :)

Kayla and I could definitely dominate a few quarts by ourselves-- but when Grandma would say, "Girls, don't eat too many cause I'm makin' a pie later today!" ...we definitely found some self-control. :)  Grandma Marilyn's strawberry pie was just... OUTSTANDING!  I never understood why the strawberry pies in the restaurants didn't taste as good as Grandma's-- and I think now that I'm older, I realize that Grandma didn't use the premade gel packets you can buy in the stores.  As a lady born in what Tom Brokaw has labeled "The Greatest Generation," she knew how to make anything from anything and just make do with--- or without!  Grandma's pie was awesome because she MADE the filling from scratch--- no store-bought "goo," no box of Jello with food coloring added, no nothing!......not a single bite was phony, but instead filled with luscious strawberry goodness. :)

Oh how I loved spending time with my Grandma--- and miss her every day!!!

Even though amidst all the recipes I *do* know of hers, the strawberry pie recipe is one I've never found.  I was inspired by this recipe on the internet though, and modified it for me. :)  Don't be scared away by making pie if you've never done it--- this recipe is SO EASY!!!!!!

I think Grandma would be proud!!! <3


fresh strawberry pie
ingredients:
2 quarts strawberries (fresh from the farm are desired!)
scant 1/2 cup water
scant 3 Tbsp cornstarch
   *check your local food stores for non-GMO Cornstarch!
3/4 cup sugar (if your berries are really sour for some weird reason you could bump this to 1 cup)
1/2 Tbsp butter
one, 9" pie crust (either make it yourself or buy one from the store.)
    *I tried Paula Deen's flaky pie crust recipe from her "Southern Cooking Bible" last night and it was great!
    *If you've never made pie crust before, I HIGHLY RECOMMEND that you spend a teeny bit of money and purchase a pastry cloth and a rolling pin cover.  You will NEVER be sorry you did! I never thought I could make pie, until my dear mother-in-law taught me how to use a pastry cloth & rolling pin cover.  LIFE-CHANGING!!! :)

directions
  • if you're making your own pie crust, do this FIRST.  Roll out and bake the empty pie shell (don't forget to put your pie weights on top of your crust to keep it from bubbling up!! I used a bag of dried black-eyed peas because I don't have any fancy clay pie weights) :)  When your crust is baked, remove the weights/dried beans and let it cool!
  • take a few of the less-pretty (but just-as-tasty!!) strawberries; rinse them off, and crush them up till you have 1 cup of crushed berries (I did the crushing right in my pyrex clear liquid measuring cup so I knew right when I had 1 cup!)
  • To a small saucepan, add the 1 cup crushed strawberries, plus the water, cornstarch, and sugar.
  • Cook this mixture on medium-high heat until it boils, stirring constantly.
    • At the beginning of this, I used my immersion blender to really blend everything together.  I highly recommend doing this step! If you don't own an immersion blender, maybe you can make the strawberry mixture in a food processor at first!  OR if you don't own any blending/processing equipment, your "filling" mixture will still be GREAT!  It will just be a little more 'chunky' rather than smooth. :)
  • When the strawberry filling mixture reaches a bubbling boil, let it cook for exactly 2 more minutes **stirring constantly**!
  • Take the filling off the heat and add your 1/2 tablespoon of butter.  Stir the butter in, then let your filling cool for a while.  Honestly I put mine right in the fridge and let it sit until it wasn't super-hot... then moved it to the freezer to cool even quicker. I only had my filling in the freezer for 10 minutes or less.  Just enough to get it to room temp!
  • while you're waiting on the filling (and maybe crust) to cool, take all of your remaining strawberries and rinse, dry, set aside for pie.  Maybe you like to slice your strawberries... but I remember Grandma always left them whole--- so I did, too! :)  I did, however, cut the really big strawberries in half or thirds so all the berries/berry pieces were about the same size.
  • Arrange the strawberries in the baked pie shell.
  • When the glaze is cool enough/room temperature, pour the filling over all the berries. If needed, spread it around with a spatula to help it get in all the cracks.
  • Let pie cool in the fridge for about an hour (or until you can't wait anymore! haha!) :)
Definitely serve with whipped cream!  I bought a pint of whipping cream and added about a tablespoon of sugar and whipped my own!  So worth it!!!!!


 Enjoy!! It is SO EASY and THE BEST! :)

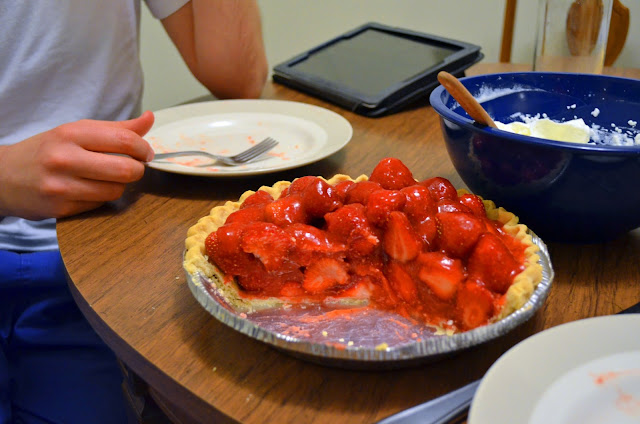
just look at that mountain of strawberry gloriousness!!!  the Doctor and I dominated a good bit of it last night! soooo good! :)
speaking of grandmothers... at my husband's Grandma Vera's house, a sign that you loved your pie was that you lick the plate clean! :)  I'm so glad that both of us keep our grandparents' traditions alive in our own home today! :)

Friday, June 7, 2013

Coconut Chicken


I had such a fun time making this chicken! :)
A perfect recipe for 2 people (obviously you can double/triple it), and I love that it's EASILY convertible to a Gluten-Free recipe! :)

Coconut Chicken
serves 2, total time about 15 minutes
ingredients:
*****Note: I didn't measure when I made this; so feel free to add/subtract amounts as you see fit! I am just estimating what I did) :)

* 2 boneless, skinless chicken breasts (I used 3 breast tenderloins, actually; gave one to myself and 2 to the Doctor) :) BUT you could easily use a few chicken thighs, too! whatever you like.
* 1 egg
* about 1/2 to 2/3 cup flour
* about 1/4 cup shredded, unsweetened coconut 
* about 1/4 cup Panko breadcrumbs
* pinches of salt & pepper
* 4 Tbsp. Coconut Oil

**To make Gluten-free, substitute Gluten-free flour for the all-purpose wheat flour; Substitute GF breadcrumbs for the Panko-- OR I bet a GF cereal like Rice Krispies or Chex would be awesome! :)  The purpose of the Panko was just to give it some crunch! :)

directions:
Heat the Coconut oil in a skillet on medium-high heat.
Blend the flour, coconut, Panko, and salt and pepper in a food processor until it comes together (about 10-15 seconds). :)  Place breading mixture on a plate.
Beat the egg in a small bowl (but big enough to dip your chicken).
Dip chicken into the egg, then into the breading.
Cook breaded chicken in Coconut oil until golden brown; flip; cook on other side till golden brown. :) 

I served this with wild rice and sauteed spinach! ;)
Enjoy! :)