**sigh** :)
'Tis the season of butternut squash soup, apple crisp, chili & cornbread, pumpkin spice lattes, pumpkin cheesecake, pumpkin cake, pumpkin cookies, oh wait, I see a theme.... PUMPKIN. Mmmm. :) One of my FAVE fall flavors.
I've been desperately trying to find cans of good old "Libby's Pure Pumpkin" in the stores now for some time, and to no avail, there.. just... isn't any. :( (I've checked Meijer, Kroger, you name it!)
 |
| from Meijer's website. Look: it even says "out of stock"!!! |
So instead of just giving up... I just figured I could do it myself. We made homemade pumpkin purée in Rome, where there is like... NO canned pumpkin whatsoever (except *very expensive* cans imported from the States!)--- and we used to make something like 16 pumpkin pies for a massive Thanksgiving outreach party for all our Italian friends! So why not turn around and use the knowledge I gleaned in Italy right here in the U.S.? :)
I started with purchasing 2 "Pie Pumpkins" from local Michigan farms at Meijer... (again, my dig. camera is *still broken* --- wah wah! --- so I'm having to borrow other people's lovely pictures).
The pie pumpkins looked like this:
 | |||
| from |
Notice how pie pumpkins aren't as small as the cutesy ones people use to decorate... but at the same time, they aren't as big as the "jack-o-lantern" type pumpkins that people carve!
After researching several recipes, I decided upon the roasting method (rather than steaming or boiling them on the stove top). One probably isn't better than the other, I just didn't have a lot of time/energy to stand by the pot and babysit the boiling pumpkins, so sticking them in the oven felt more freeing for me.
Here are my 10 Easy Steps for Pumpkin Purée:
1) Preheat oven to 325 degrees F... and get out a baking sheet and your carton of aluminum foil.
2) Wash dirt off outside of pumpkin.
3) Carefully cut stem/top off, discard.
4) Cut pumpkin in half, from top to bottom.
5) Everyone has their own preferred "de-pulping" method, but my favorite is to first, take out all the seeds (using my fingers)... Then use a combo of a serrated knife and big serving spoon to cut/scrape out every last string I can get to. In my opinion, it is so worth it to spend a lot of time getting the strings out. Who wants stringy purée? Not this girl. And probs not you, either.
6) When you're done, you'll have 4 pumpkin halves, de-seeded and de-stringed. Cover each pumpkin half with a piece of foil.
7) Bake in oven till tender (check on them like you would a baked potato)... Let them go for at least an hour, mine probably were in there 1 1/2 hours.
8) Let cool for 15 or so minutes.
9) Scrape out pumpkin flesh from the skin.
10) Time to purée: I **tried** first to put my pumpkin chunks into our blender (the awesome KitchenAid one I wrote about a few posts ago), but something just wasn't meshing between the blender and pumpkin... it just didn't work. SO I changed direction and put the pumpkin in a plastic container that came with our immersion blender, and puréed the chunks until smooth. This worked out PERFECTLY and if I ever roast pumpkins again, I will skip the big blender altogether and just stick with my immersion/hand/stick blender.
OR, if you have a food processor, obviously that would be a great kitchen tool for processing your pumpkin.
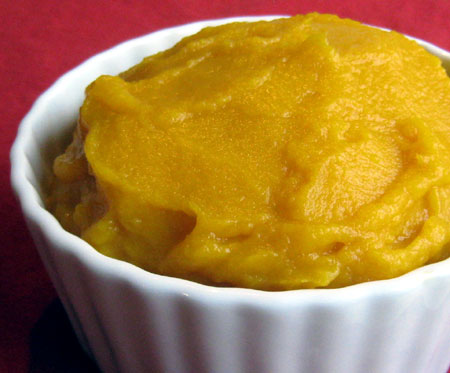
Voila'! 10 Easy Steps to taking a whole pumpkin and ending up with perfect purée!
 |
| from |
Happy Fall to All--- the season of pumpkiny goodness! :)
No comments:
Post a Comment